Application Packaging, How-To Guides, Software Installation Guides

Sideloading Windows Store Apps in Windows 10 with a reusable PowerShell script

So today I was tasked with creating a PowerShell script to sideload Windows Store apps for Windows 10. When I started looking at what I was being asked to do I realized that instead of creating a separate script for each of the apps that they want to load, it would be easier if I could create a generic script that would work for any .appxbundle package file.


First I created a variable for the script path:

$executingScriptDirectory = Split-Path -Path $MyInvocation.MyCommand.Definition -Parent


Then I used the “Get-Childitem” cmdlet with an “-include” parameter to choose the .appxbundle file type:

Get-Childitem $executingScriptDirectory -include *.AppxBundle -recurse 


In order to account for the possibility that there would be more than one .appxbundle package in the folder I am running the script from, I piped the Get-Childitem to a foreach and then called on the “Add-AppxPackage” cmdlet:

Get-Childitem $executingScriptDirectory -include *.AppxBundle -recurse | foreach ($_) {Add-AppxPackage $_.fullname} 


My final code looked like this:

## Set variable for directory where script and appx package reside
$executingScriptDirectory = Split-Path -Path $MyInvocation.MyCommand.Definition -Parent
## Run for every .appxbundle file found in the directory
Get-Childitem $executingScriptDirectory -include *.AppxBundle -recurse | foreach ($_) {
## Install appx package
Add-AppxPackage $_.fullname
}


Of course, this doesn’t account for regular .appx files, nor does it work when your appx or appxbundle file requires a dependency. Since I didn’t have a need for those options I didn’t expand on my script to include them, but if you do, then at least this script might be a good jumping off point for you.


That’s all for now. Tune in next time for more random software deployment tips!

Application Packaging, PowerShell

Running an .exe from a path with a wildcard in PowerShell

It’s been a while since I have posted anything and there is no shortage of topics for me to catch up on. I am going to start with a problem I was working on the last couple of days. Here is the scenario:

I was tasked with packaging the installation of an application that was previously installed manually by the users of the environment I am working in. When the users installed the application from the vendor’s website it would get installed in each user’s appdata folder. The version I was given to package was designed as a per-system install. They also wanted me to remove the per-user install before installing the new per-system version. After creating the package for the new version, the issue became being able to uninstall the per-user version. The install was not an MSI and the vendor’s method for uninstalling was an uninstall.exe file located in the appdata folder where the application had been installed for the user. This is obviously tricky because depending on which user installed the application it could be located in any random user’s folder path. I’ve been using PowerShell for my primary scripting language for most application deployments for some time now, so the key was finding a way to do this in PS. My solution was as follows:

powershell_5-0_icon

First I set a variable for the path with my wildcard. I used the cmdlet resolve-path so that the variable would have the value of whichever user had installed the application I was trying to uninstall by searching for the uninstall.exe in the application folder.

$AppUserPath = Resolve-Path "C:\users\*\AppData\Local\AppVendor\AppName\Uninstall.exe"

Then I created an if statement that would test for the resolved path if it existed and the remove it


If (Test-Path $AppUserPath) { Start-Process -FilePath $AppUserPath -ArgumentList "/S"}

So all together it looked like this:


$AppUserPath = Resolve-Path "C:\users\*\AppData\Local\AppVendor\AppName\Uninstall.exe"
If (Test-Path $AppUserPath)
{Start-Process -FilePath $AppUserPath -ArgumentList "/S"}

So now when my script runs, it will parse through all the user appdata folders on the machine and find the one with the application installed that has uninstall.exe file. Then it will execute the uninstall.exe file using the resolved path that it found. After that installing the new per-system version was a piece of cake

Application Packaging, How-To Guides

Silent Enterprise Deployment of an Adobe AIR Application

Installing Adobe Air applications manually is pretty simple. Within a few clicks your app is installed and you are off and running. Recently however, on my current project I am consulting on, I was asked to deploy an Adobe AIR application through SCCM 2012 silently. I used the following steps:

  1. Extract the application so that you have the .air file.
  2. Make sure that Adobe Air is installed on the client machine
  3. Create an Install Script(cmd,powershell,vb, whatever you perfer) to move the .air file somewhereon the client machine, and then install it.
    • For this I used the location of the Adobe AIR Application Installer
    • Any place will work as long as you can reach it via UNC
    • Install the .air file by usinga cmd-line similar to
      • “C:\Program Files\Common Files\Adobe Air\Versions\1.0\Adobe AIR Application Installer.exe” -silent -eulaAccepted “C:\Program Files\Common Files\Adobe Air\Versions\1.0\%applicationname%.air
      • There are also other parameters to create shortcuts on the desktop/startmenu, please research online if you want to use those.
  4. Create an Uninstall Script
    • for some reason Adobe has engineered the ability to uninstall via the product GUID even though their installs are more complicated
    • A typical msiexec.exe /x {application guid} will work.
  5. Setup an application with a scripted deployment type in SCCM and point your install and uninstalls to your corresponding scripts
  6. That’s basically it, obviously there are more steps to set up your application in SCCM and stage it on repository for your DPs but those are going to be the same as you would do for any other application.
Application Packaging, Green, How-To Guides

Kind of Fixing VMware error – “The trust relationship between the workstation and the primary domain has failed”

What?

If you have used VMware in a corporate environment it is very likely you have seen the message before;

The trust relationship between the workstation and the primary domain has failed.

It is annoying and is one of those things you just don’t want to run into while in the middle of figuring out a more important packaging issue with an application.


Why does it happen?

This message occurs because the VM’s machine account is on the domain. And since it is on the domain it syncs it’s password with the domain every 30 days to make sure the domain is aware of any changes and the machine is aware of any password policy changes as well. However since you generally use a VM so that you can revert to a saved state, the password sync between your VM and the domain gets thrown off. Once the domain decides that your VM is out of sync it disconnects the VM from the domain to protect itself.


How can you fix it?

According to VMware’s official KB (KB2100393) you should create a new policy on your tenant AD server. Unfortunately you don’t always have access to your AD server to make that policy.

What you can  do is edit the registry of your virtual machine so it stops the check for the password sync. The reason this post says, “Kind of Fixing” is because this may or may not work.

The consistency of this registry hack working is not perfect, but it is something simple you can try to remove this reoccurring headache. For more information on this type of fix visit Microsoft’s page here.


Registry Edit Steps:

1. With admin rights launch regedit.exe from within your VM

2. Navigate to HKEY_LOCAL_MACHINE\SYSTEM\CurrentControlSet\Services\Netlogon\Parameters

3. Double click the entry for DisablePasswordChange

4. Make the value 1 instead 0

5. Save your changes

6. Cross your fingers and hope it works for you.

Amber, Application Packaging, How-To Guides, Software Installation Guides

Lync 2013 Basic Deployment

These instructions are for Microsoft Lync 2013 Basic which has fewer features than Lync 2013 Full. However the basic concept will work for both versions.

Step 1 – Extract files from the Lync Basic installer: %sourcelocation%\lyncentry.exe /extract:%extractionlocation%

Step 2 – From the extracted files run the OCT tool: %extractionlocation%\setup.exe /admin

Step 3 – Use OCT to configure a msp file to your desired customization choices.

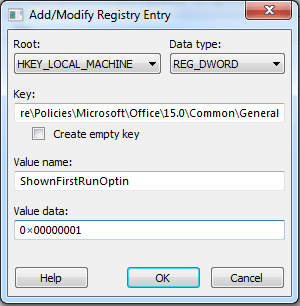
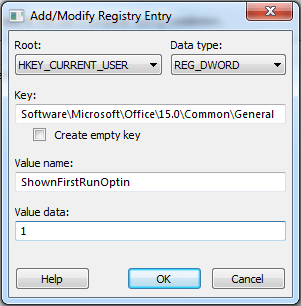
Step 4 – To avoid the “First things first” window when user start Lync for the first time add the following reg entries under Additional Content | Add Registry Entries in the OCT tool

lync step5a

lync step5b

Step 5 – Save your settings to your MSP file.

Step 6 – Deploy your MSP. How you deploy is up to you:

  • You can add the MSP file you create to the Updates folder of the extracted files from the source installer and run the install with the command %extractionlocation%\setup.exe. This will install all the msp in the Updates folder including your custom MSP. You will see a Microsoft setup window for a second as it reads the MSP file before installing.
  • You can save the MSP to whatever place you like and use a command that will point to that place; %extractionlocation%\setup.exe /adminfile %yourcustomMSPlocation%
Amber, Application Packaging, Software Installation Guides

Visual C++ 2012 for Enterprise Deployment

Recently I had to package several versions of Visual C++ for a client including the 2012 version. Previous versions of Visual C++ have proven to be pretty straight forward, but 2012 is a little different:

1. Download the installer from Microsoft here.

2. Install the executable on a PC/VM.

3. Navigate to C:\Program Data\Package Cache\.

– There might be several sub folders in this location. Go through them until you find one that has a vcRuntimeMinimum_x86 folder, there will be a separate one with a vcRuntimeAdditional_x86.

– Obviously if you are installing the 64-bit version the folder names with say x64 instead of x86

4. Copy the MSI’s and CAB files in each folder and move them to a folder to stage your package.

5. Create an MST with whatever standards you want and add the public property of ADDEPLOY=1 so that you don’t get this message:

“To install this product, please run Setup.exe. For other installation options, see the Installation section of ReadMe.htm”

6. Install vc_runtimeMinimum_x86.msi first, then install vcRuntimeAdditional_x86.msi second. Include your transforms :

– Example  – “msiexec.exe /i vc_runtimeMinimum.msi TRANSFORMS=MST.mst /qn”

*alternative* – You could also create a chained MSI package for the two so that you don’t have to run two separate installs. Please read here on how to created a non-streamed chained MSI package.

Amber, Application Packaging, Application Virtualization, How-To Guides

Application Compatibility- A Process Overview

It seems almost a forgone conclusion to most home pc users that Windows 7 is in their homes and Windows XP is just a tale to tell the grandkids. But for many corporate and IT environments Windows XP is still alive and kicking….at least for now. Windows has set a date to end support for Windows XP on April 8th 2014. It’s a big deal to switch from one OS to another the corporate world, and expensive too. One of the most important and stressful parts of that migration to a new OS is application compatibility. Applications have come a long way in the past couple decades…and believe it or not companies are still using applications that are sometimes older than the tech support team trying to support them. Back when Windows XP first came out software companies kind of did their own kind of thing when it came to designing how their applications were installed and functioned on a computer. They didn’t care about playing nice with the OS or the other applications that may get installed on the same machine. What resulted was a very messy bunch of hacked registry files and system files that caused more blue screens of death to be funny. So when Microsoft design Windows 7 they decided to firm up what software was allowed to do to the OS. There is a limit to what changes can be made and which files can be accessed by applications being installed on a pc. For software that was designed before Windows 7 this can lead to complete failure…so what do you do? If you are the system administrator or application manager for an organization where do you start?

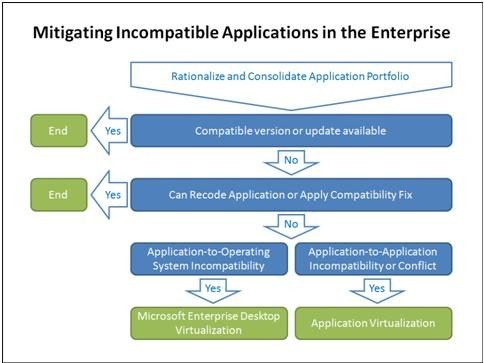
Application compat process overview

The above graphic shows the compatibility process an application must go through when getting ready for Windows 7 from XP or from a 32bit OS to a 64bit OS. Both types of migrations bring along with it compatibility concerns that could potentially bring a company’s productivity to a screeching halt. Lets dive a little deeper into each step of the process to understand what is really involved. We will use a Windows 7 migration as our example in the following information, however the steps for compatibility from 32bit to 64bit OS or to Windows 8, etc are the same.

INVENTORY

I cannot….I repeat cannot stress how important a proper inventory is. If you don’t do a complete discovery of the applications in your environment you will might be able to get off the ground running but you will end up flat on your face. When doing a discovery you should not only be looking for the major application products that you think your organization uses, but also the ones that your users take for granted. This can be small programs like 7zip or VLC player. Since they are free these tools can sometimes be overlooked. Even more overlooked however is the dependencies for all of your programs. Usually you dont notice them because they install automatically with your main applications, but some of them don’t even show up in your programs and features(add and remove programs from XP). If you don’t test not only your primary applications but your dependency applications as well you will be in a world of hurt. Additionally, if you don’t discover as many as these little buggers as you can early on you will not budget your time or money for your migration project correctly. It’s the difference between you think you have 150 applications and 400. So if you don’t want to start a project telling your bosses that its one price only to get started and discover it will cost you triple, its important to do a proper discover of ALL the applications in your environment. Microsoft provides a tool to help you discover your applications as well as some more information about your environment called (MAP) or (Microsoft Assessment Planning) Toolkit. For information on that tool please see the information available on Microsoft’s product page.

ANALYZE

Now here comes the tricky part. There are a couple of ways of analyzing your applications for compatibility issues. You can hire programmers to debug you applications one by one on your new Windows 7 image to find the issues and try to remediate(fix or put a band-aid on) them. This would be a possible option but not probable, considering the man hours and cost involved of taking this approach. You can use Microsoft’s compatibility toolkit otherwise known as (ACT) or (Application Compatibility Toolkit).  You can have a team of employees who know what the applications are used for analyzing the applications to see if anything errors out or doesn’t function correctly. This method could be cheap but leaves you with no guarantees of what will really work and what might or might not break when in production. There are also a few third-party compatibility analization tools out on the market. The top two being Citrix’s AppDNA and Quest Software’s Changebase. These two products will give you a RAG status and a report as to what compatibility issues it has found. They each have different modules and versions based on what you want to analyze and pricing to match. (From personal experience at the time of writing this blog my opinion is that AppDNA gives more detailed reporting than Changebase, but you will want to check out what the current features are to make sure which tool is best for you if you decide to use one.) No matter how you analyze your applications you will want to be able to sort them into three main categories. These categories are usually referred to by their compatibility status of Red, Amber, or Green. Red applications are ones that have serious compatibility issues resulting in application failure or malfunction. Generally if you application falls under this category is considered high unlikely to work well on Windows 7. Amber applications are ones that have some compatibility issues but are generally able to be fixed to work properly in a windows 7 environment. Green applications are either free from compatibility issues or if they have any issues at all they do not impact the functionality of the app.

TESTING

Once you have sorted out the compatibility status of your applications you can spend some time testing them on your environment and remediate any issues you can through repackaging, scripting, virtualization, or some other means depending on what the issues are and how your IT team would like to approach fixing them. (It is not uncommon for some IT departments to make their own rules about which compatibility issues they are going to try resolve and which they will ignore assuming they will not impact functionality to their users by ignoring them.) If you have done your discovery and analyzing properly you should have a good idea before starting testing and remediation which applications will need work, which applications can do to the next phase of the process, and which applications will need to be mitigated. It is also recommended at this phase to do a UAT test or a User Acceptance Test. This is a chance for someone in your organization who uses the application you are testing on a regular basis to try the app if you have made changes or not and see if the user experience of the application installed on your new OS environment will work correctly and function as needed for production use.

MITIGATE

Mitigating applications

So what do you do if you applications wont work on your new environment and can’t be remediated? You mitigate! As it shows in the graphic above there are few options to look into when trying to figure out what you can do with applications that are absolutely not compatible with your new OS environment. You can check with the software vendor for new versions, you can have a programmer recode your application with the fixes you need. You can try desktop or application virtualization, so when it comes down to it if you really can’t live without that application you got when you where still running Windows 98 you might still be able to get it up and running on your new OS environment. Microsoft has also provided a toolkit for doing some forms of mitigation as well called the (MDOP) or (Microsoft Desktop Optimization Pack).

So now are you ready to begin your application compatibility journey????? Well if you are looking for more detailed information to any and all of what was covered above look for more posts from softwaresushi.net. If there is something specific about compatibility testing or other topic you would like to see featured here send us an email or connect to us on Facebook or Twitter.

Happy AppCompat Testing!

Application Packaging, How-To Guides, Red

Non-Streamed Chained MSI packages with InstallSheild

What

Chained MSI packages have been possible for a several years now ever since Windows Installer 4.5. Starting with InstallShield 2009 packagers have the option to create chained MSI packages but after researching them myself recently I have noticed there is not much to go on other than Flexera’s white paper. So here is my take…


Why

As a packager, application management admin, or “jack of all trades” (as is usually the case in the application management world), chained MSI packages offer an elegant solution to a messy problem. While working with vender media the source that is usually provided to you from the publisher wraps the installation up nicely through an InstallShield executable exe file. This is great for a single user to manually install. But what do you do when you want to jump to that new operating system, or new deployment infrastructure? Well that’s when you begin to unravel the mysteries of how your source media was setup by your vendor so you can make an easy to use, standardized installation that you can deploy to all your users itching to get back to work. As you are discovering the pieces of the puzzle that the application manufacturer as created you discover that it contains not one…not two…but multiple MSI files. If you follow packaging best practices you know better than to create a nested MSI or capture. There are merge modules that you can sometimes use to combine your dependency applications to reduce the number of MSI packages you have to deal with. However as explained in the Flexera white paper these options have limitations. The major limitation being the ability to perform long-term maintenance on the individual products contained in the MSI packages after they are installed on the target system. This is where chained MSI packages become the perfect solution. With a chained MSI package you can have all your pieces of your pie together in one pie pan and yet still have access to each piece of pie individually as well. And that’s really the best way to think of how it works. The pie pan being the chained MSI itself and the pieces of pie being the individual MSI packages that came originally with from the application vendor, or custom MSI packages created to work alongside them.


How

Also in the white paper by Flexera is an attempt to explain the options you can choose while creating your chained MSI package. The white paper’s recommended option is to “stream” your individual MSI files into the chained MSI. Now understandably this is the cleanest and most compact solution when creating your chained MSI, however, it’s also the most limited. Even the white paper itself explains the limitations of creating a streamed chained MSI packaged. Just to name the most important limitations: package size limit is 2GB; streamed media is placed in temporary storage during install and removed by default after installation is complete. For me the last one is most important. By not having the source media available on the local system after install repairs or individual packages would have to be pointed to a location where the original source files can be found. So that is why this post is about Non-Streamed Chained MSI packages. By not streaming the files directly into the chained MSI you allow for much more flexibility and easier long-term maintenance of the application after local installation.


Step 1

First make sure you have discovered all the files you plan to include in your chained MSI package. For this example I have renamed some MSI files generically so that it would serve the purpose of this instruction better.
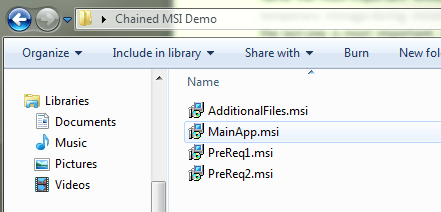


Step 2

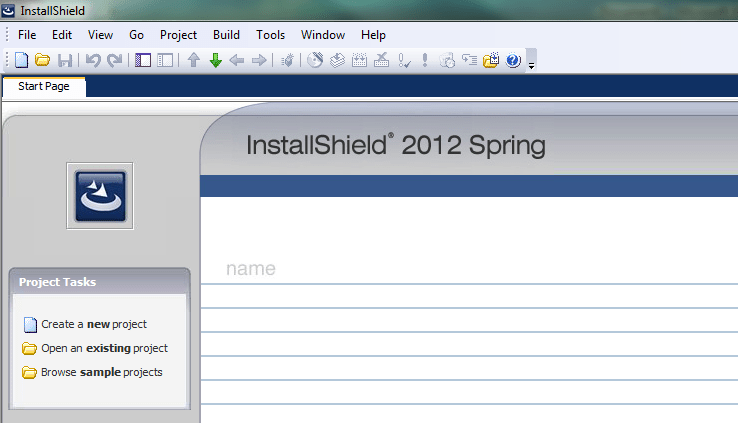
Open InstallSheild and click on create new project.
 

Step 3

Choose Basic MSI Project

Fill in the Project Name field with whatever you want to call your chained MSI

Choose what project save location and folder settings you wish, then click OK


Step 4

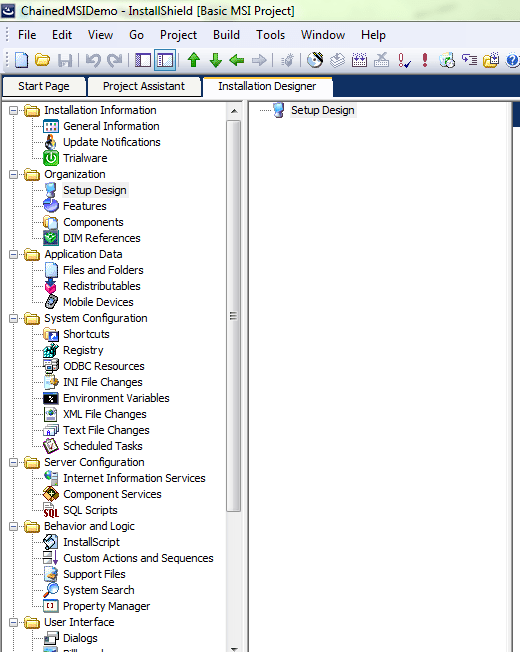
Navigate to the Installation Designer tab

Choose Setup Design from under the Organization section
 

Step 5

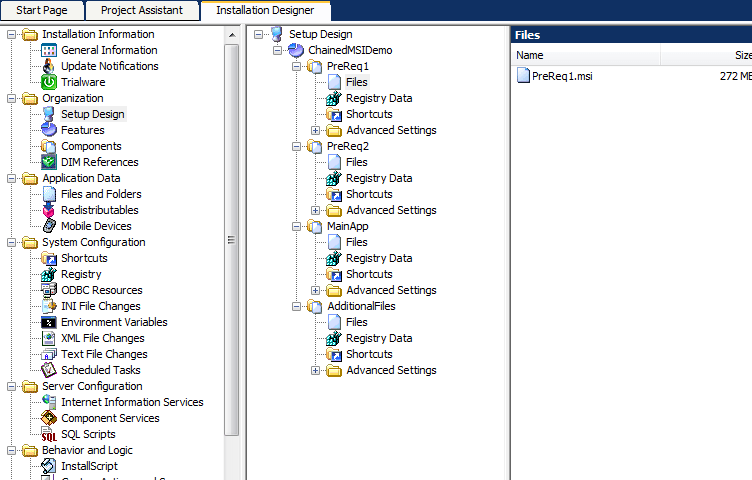
Create a single feature, and as many components as you have separate MSI files that you are going to chain together. If you wish to add additional files outside of the MSI installations you plan on chaining together that is ok too. Just remember that whatever you put in your setup design installs first before the MSI files you are chaining together installs. At this time you can also add the files to each component that you are plan on including.
 

Step 6

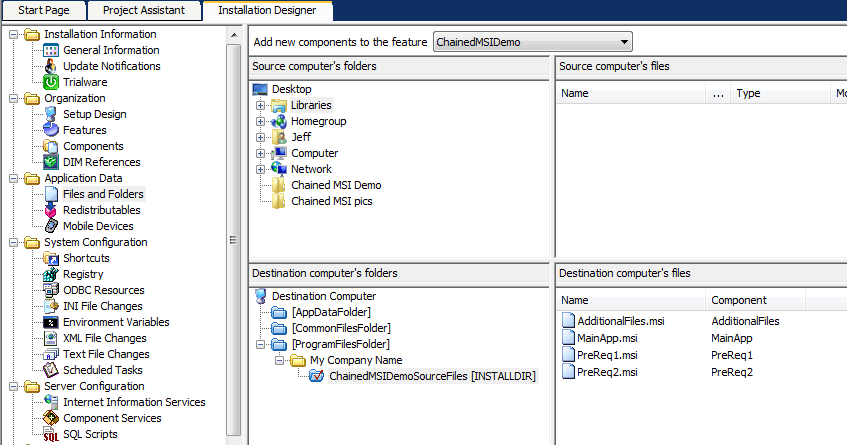
Navigate to Files and Folders under the Application Data section.

Here is where you are going to plan out where to copy your source files to the local system before the MSI packages are installed. My personal preference is to either put them in a sub folder under the vendor of the main application you are installing or under a designated folder on the system where source files for all your applications will live. Make sure that all the source media files you plan to execute during the chained MSI process are located in the INSTALLDIR folder location of your package. Using the INSTALLDIR location is not necessary(other folder locations can be used), but it makes your work later much easier.
 

Step 7

Now that our files are in place we can make the magic happen.

Navigate to Releases under the Media section
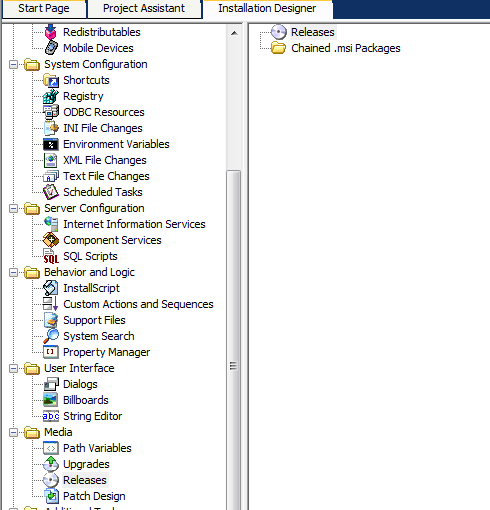
 

Step 8

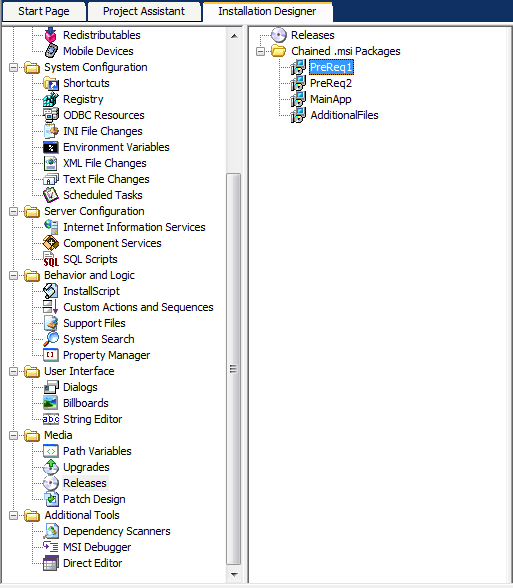
Right click on the folder that says Chained .msi Packages and click on New Chained Package(or you can just left click on the Chained .msi Pacakges and press Insert to create a new chained package as well.)

I like to rename each chained MSI package to match the name of the MSI I will be associating it with, but whatever naming you choose will be fine. Just remember that the order you place your MSI packages on this list will be the order in which they are installed.


Step 9

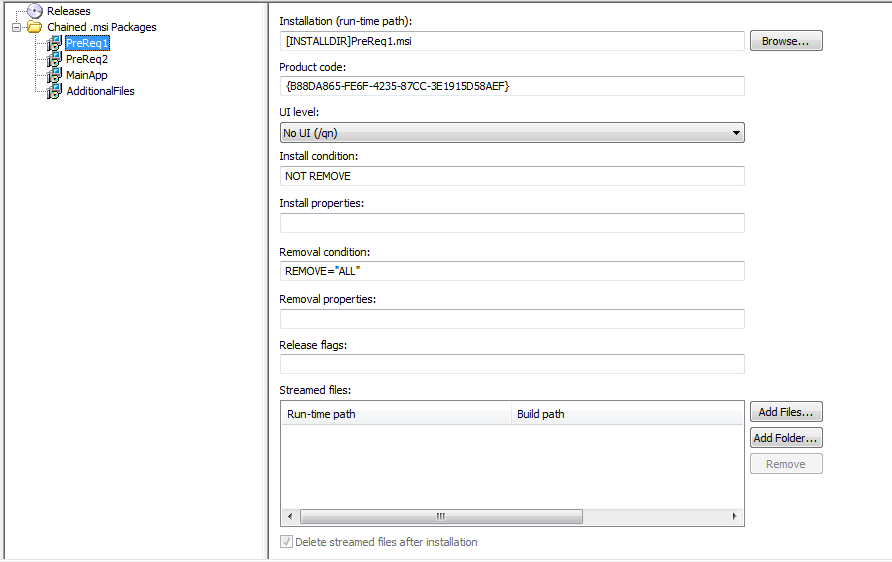
At this step it is a good idea to have the information about your MSI ready. This information definitely should include the MSI name, product code and any public properties you want to set or names of transforms you want to use with your individual MSIs in the chain. You can also choose the MSI UI level at time of install here.

Notice that in the Installation (run-time path) field it says”[INSTALLDIR]PreReq1.msi” you WILL want to type NOT browse to this location into the text box. Since this location does not exist yet on the physical machine you will not be able to browse to it.
 

Step 10

Once you have filled out the information for the chained MSIs then go ahead and build your release. (If there any other settings you would like to change before creating your final MSI release, please make them before this point. This could include the ARPSYSTEMCOMPONENT=1 in the property table to make sure that only the ARP entries for the individual MSI packages will be seen and not an extra entry for the chained MSI itself.)
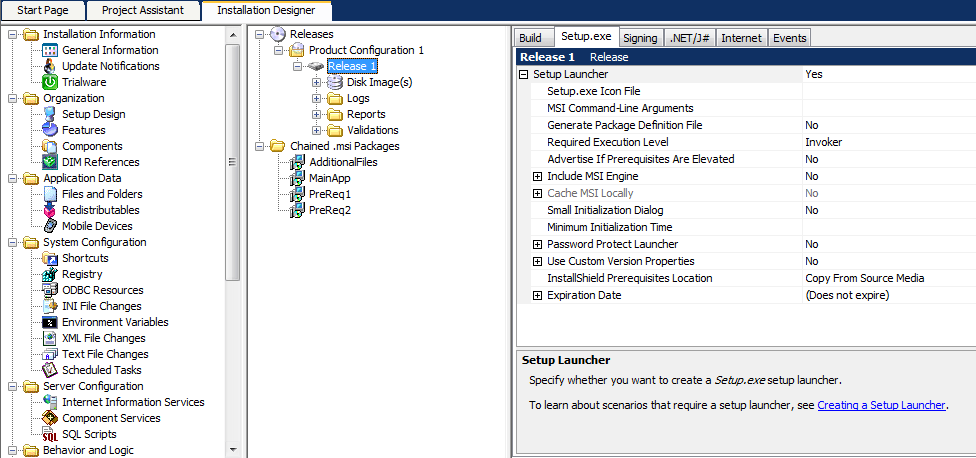
 

(To clean up your install files even more you can change the setting in your release to not include a setup.exe launcher. Since this is the sort of thing that we are trying to avoid using, and using one with a chained MSI is not reliable anyway this is an easy way to cut unwanted files.)


Well now you know…one way at least, to create a chained MSI. Thanks for stopping by, and if you have any comments or suggestions please make sure to leave them here on the post or email them to us. Happy packaging! Continue reading

Application Virtualization, Red

App-V 5.0 Beta: A Change is Brewing

What’s going on?

It’s all over the web; virtualization and packaging bloggers are all offering their thoughts on the new changes to App-V in Microsoft’s latest beta 5.0.  For those not familiar with App-V or Microsoft Application Virtualization, there are definitely more resources on the web to learn about it than there were back when Microsoft first acquired the software from Softricity when it was known as Softgrid. For more basic information on what App-V does straight from the horse’s mouth go here.

Let the Changes Begin:

  • The sequencer no longer uses the CSIDL to parse files and path information but instead a new VRG with is a specific syntax to App-V.
  • The file format has changed from .pkg, .sft to .appv. This is also an App-V specific format that will move App-V from block streaming to a compressed folder format. The new format effectively removes the 4GB package limitation of the current version of App-V. (Can someone say virtual Adobe Suite, AutoCAD and many more?)
  • OSD files are gone too. Since the new file format and virtual package system allows for the application shortcuts to point directly to the exe file instead of the App-V client the XML configurations that the OSD held are no longer needed.
  • Because of the way the virtual application configurations are controlled using the new format both per user and per machine configurations are supported for an application at the same time.
  • The MMC console that was previously used to manage published apps is now replaced by a web-based management tool that is based on Silverlight.
  • Because of App-V now using the industry standard web servers to publish applications they will no longer need to restart downloading if interrupted. Instead they will continue once reconnected and download only the remaining files that need downloaded

If you want to play around with all the new App-V software without having to download and install it all yourself you can visit Microsoft’s Virtual Lab. It’s not without its bugs and sometimes the screen resolution on the remote machine can be annoying.

Here is idea of how the new App-V system communicates:

Screen Shots of the new parts of the App-V software bellow:

Sequencer screen shots

Client Screen Shots:

App-V Server:

My 2 Cents

I’ve worked with App-V since the days of Softgrid and have always been interested how such technology will be able to make a serious impact not only on a corporate scale but in the private sector as well. With the new changes Microsoft is making to the virtualization technology I think we are heading into a new paradigm when it comes to application packaging. There are still limitations that will make traditional MSI packaging necessary, however the architecture level integration of App-V into the Windows OS will make virtualization very attractive. The security and management options presented by App-V are enough to make corporate IT managers excited. Although it is still in beta App-V 5.0 presents us with the leap forward Microsoft and virtualization technology really needed to not only be taken seriously but give our old concepts of application packaging and management a run for its money.