Amber, Application Packaging, How-To Guides, Software Installation Guides

Lync 2013 Basic Deployment

These instructions are for Microsoft Lync 2013 Basic which has fewer features than Lync 2013 Full. However the basic concept will work for both versions.

Step 1 – Extract files from the Lync Basic installer: %sourcelocation%\lyncentry.exe /extract:%extractionlocation%

Step 2 – From the extracted files run the OCT tool: %extractionlocation%\setup.exe /admin

Step 3 – Use OCT to configure a msp file to your desired customization choices.

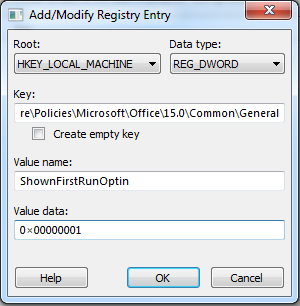
Step 4 – To avoid the “First things first” window when user start Lync for the first time add the following reg entries under Additional Content | Add Registry Entries in the OCT tool

lync step5a

lync step5b

Step 5 – Save your settings to your MSP file.

Step 6 – Deploy your MSP. How you deploy is up to you:

  • You can add the MSP file you create to the Updates folder of the extracted files from the source installer and run the install with the command %extractionlocation%\setup.exe. This will install all the msp in the Updates folder including your custom MSP. You will see a Microsoft setup window for a second as it reads the MSP file before installing.
  • You can save the MSP to whatever place you like and use a command that will point to that place; %extractionlocation%\setup.exe /adminfile %yourcustomMSPlocation%
Amber, Application Packaging, Software Installation Guides

Visual C++ 2012 for Enterprise Deployment

Recently I had to package several versions of Visual C++ for a client including the 2012 version. Previous versions of Visual C++ have proven to be pretty straight forward, but 2012 is a little different:

1. Download the installer from Microsoft here.

2. Install the executable on a PC/VM.

3. Navigate to C:\Program Data\Package Cache\.

– There might be several sub folders in this location. Go through them until you find one that has a vcRuntimeMinimum_x86 folder, there will be a separate one with a vcRuntimeAdditional_x86.

– Obviously if you are installing the 64-bit version the folder names with say x64 instead of x86

4. Copy the MSI’s and CAB files in each folder and move them to a folder to stage your package.

5. Create an MST with whatever standards you want and add the public property of ADDEPLOY=1 so that you don’t get this message:

“To install this product, please run Setup.exe. For other installation options, see the Installation section of ReadMe.htm”

6. Install vc_runtimeMinimum_x86.msi first, then install vcRuntimeAdditional_x86.msi second. Include your transforms :

– Example  – “msiexec.exe /i vc_runtimeMinimum.msi TRANSFORMS=MST.mst /qn”

*alternative* – You could also create a chained MSI package for the two so that you don’t have to run two separate installs. Please read here on how to created a non-streamed chained MSI package.